


‘Kleinboden’
The Austrian defence line before the outbreak of war
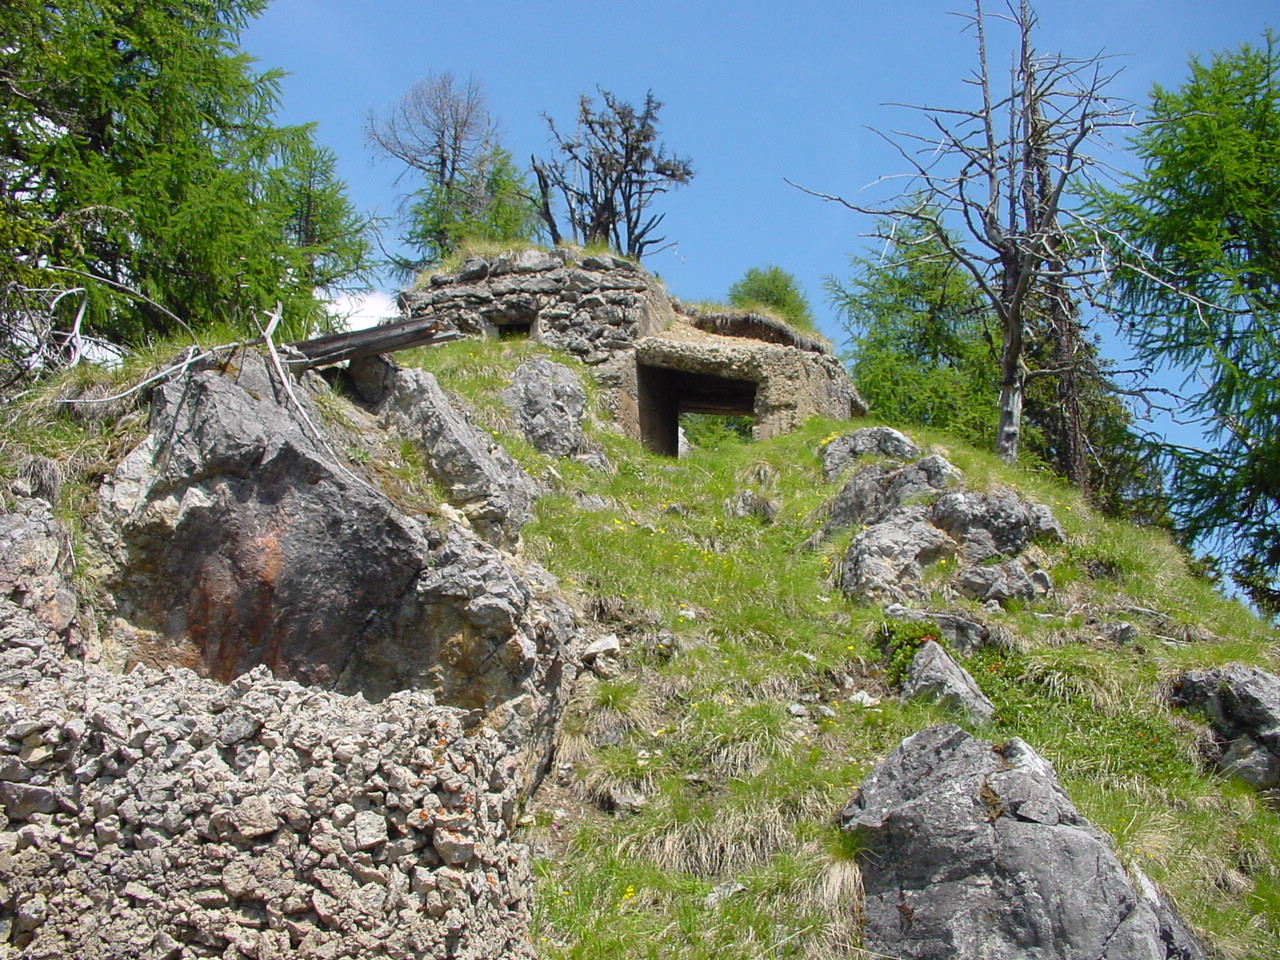
The Austrian defence plan (1912) envisaged repelling a possible Italian attack over the Stelvio Pass on a rear barrier. This line of defence, anchored on the outdated Fort Gomagoi, ran northwards to Kleinboden and southwards to the ridge of the Zumpanell. The traces that can be found today on Kleinboden bear witness to this defence intention, which, however, did not come to fruition during the war.
Not far from the Furkelhütte, which can also be easily reached by chairlift from Trafoi, you will find evidence of the artillery emplacement of the time:
-
- Austria’s original intention to defend the Stelvio Pass
- the importance of the Gomagoi fortress

Starting point: Trafoi, with the chairlift to the Furkelhütte or from Stilfserjoch on the ‘Trais Linguas’ trail to the Goldsee and on to the Furkelhütte. (approx. 3 h)
End point: Trafoi
Walking time: 60 minutes from Furkelhütte hut
Marking: with information boards
Requirements: easy walk, no significant differences in altitude.
ROUTE ‘KLEINBODEN’
The following explanations highlight places along the route and clarify their historical significance. There is no need for an actual route description – the points described below are easy to find in the terrain.

A: Mountain station: General information B: Close defence installation C: Observer’s shelter and searchlight position D: Artillery emplacement E: Path to the gold lake position F: Gomagoi fortress

A DESCRIPTION OF THE ROUTE FROM A MILITARY-HISTORICAL PERSPECTIVE
The following explanations highlight places along the route and clarify their historical significance. There is no need for a detailed description of the route. The points of interest explained below are easily recognisable in the terrain.
The K.&k. Defence intentions
Vienna’s original ideas for the defence of Habsburg territories in South Tyrol and Trentino can be traced locally at ‘Kleinboden’ and even more so at the ‘Gomagoi’ fortress. However, additional clarification is needed to understand them so that the operational context can be considered.
In the aftermath of the second (1859 with the decisive Battle of Solferino) and especially the third Italian War of Independence (1866 with the important battles of Custozza, Lissa and Bezzeca), Emperor Franz Josef I of Austria and his general staff focused on the defence of the remaining imperial territories after the territorial losses in northern Italy. The result of these considerations was the construction of an impressive line of fortifications with artillery and barrages.
These works were erected close to the border at locations that made perfect military sense, but were often located several kilometres behind the actual imperial border.

The line of Austrian fortifications for the defence of the imperial territory. Various sections were to be ceded without a fight in the event of an incident. This included the Trafoi Valley from the top of the Stelvio Pass to Gomagoi. Illustration from: Accola/Fuhrer, Stilfserjoch-Umbrail 1914-1918, Dokumentation, Militärgeschichte zum Anfassen, Au, 2000.
One of these barrages was built in Gomagoi – at the confluence of the Sulden and Trafoi streams. It was a roadblock with short-range armament. Today’s road leads through the centre of the ‘fortress’ – during the war, the fortress was bypassed to the north.

The barrage at ‘Gomagoi’ with the recognisable road layout of the time north of the fortress. Illustration from: Lempruch, the King of the German Alps, Digital: Knoll Collection, Archive MUSEUM 14/18.
The Gomagoi roadblock
The works were built in 1860/62. The brick building has three storeys. The structure would have remained undamaged if the entire centre section had not been broken through later to allow the road (now state road 38) to pass through.
It was a roadblock in the true sense of the word, as the plant was placed directly on the Reichsstrasse. In order to pass the barrier, one had to pass between the right, northern flank of the plant and the retaining wall of the steep slope of the Übergrimm ridge, which began here, about four metres away, through the inner gate, past a guard casemate, through the outer gate and then over a drawbridge. Already hopelessly outdated at the beginning of the First World War (the walls are made of stone), the barrier was nevertheless put on defence alert in 1914.

The Gomagoi roadblock. From: ‘Equipment general draft Gomagoi of the K.&k. Geniedirektion Brixen’, Vienna State Archives, Digital: Archiv MUSEUM 14/18.

Fixed buildings fell victim to the construction of the barrage in order to provide the necessary field of fire. . In technical jargon, the term ‘shaving’ was used for this. Image from: ‘Lempruch, the King of the German Alps …’, Knoll Collection, Archive MUSEUM 14/18.

The roadblock with the now missing centre section on a view from 2005; image: Wikipedia, search term Gomagoi roadblock.
The flank positions on both sides of the valley were intended to provide protection against enemy evasion actions. The right (northern) flank protection was provided by the positions at ‘Goldsee’ (see ‘Trais Linguas’ section), ‘Kleinboden’ and ‘Schafseck’. The left (southern) flank protection was provided by infantry positions on the steep ridge of the ‘Zumpanell’.

Measures to protect the flanks of the Gomagoi roadblock. Not visible on the map: the Goldsee position. Map: map.geo.admin.ch, edited by Accola.
The fortress was manned by detachments from various units. Sources document the two Landesschützenregiment Trient (No. I) and Innichen (No. III), the fortress artillery battalion No. 4 (Riva) and a detachment from the corresponding battalion No. 7 (Male, Val di Sole).
The armament of the roadblock consisted of six casemate cannons (calibre 9 cm), one casemate cannon (8 cm) and five machine guns protected by armour plates.
The number of guns for the extended flank defence of the barrage is impressive. The following were included in the defence system:
- The Taufers battery with a total of four cannons (9 cm)
- The Kleinboden battery with two cannons (9 cm)
- The ‘Schafseck’ battery with four cannons, two each of 9 and 8 cm calibre
- The ‘Goldsee’ battery with two 15 cm calibre mortars and
- the ‘Steinadler’ cavern battery with two casemate cannons (8 cm), which were taken from the even older ‘Nauders’ fortress and positioned there.

The artillery cover planned in 1913 to protect the Gomagoi roadblock. The effective ranges and target areas of the ‘Goldsee’, ‘Schafseck’ and ‘Kleinboden’ emplacements and the effective range of the casemate guns of the roadblock are recognisable. From: ‘Equipment general draft Gomagoi of the K.&k. Geniedirektion Brixen’, Vienna State Archives, Digital: Archiv MUSEUM 14/18.
The artillery positions on ‘Kleinboden’ and at ‘Schafseck’
The role of the two emplacements has been described in detail above. Access was via Stilfs and the Prader Alm, where the troops were also accommodated. Numerous accommodation buildings were constructed there especially for this purpose and were also used after the outbreak of war, although the main battle line ran along the Stelvio Pass from May 1915.
A memorial stone near the Prader Alm commemorates the thirteen victims of the avalanche accident on 25 February 1916. Those affected were members of the I. Kaiserjäger Regiment, the Fortress Artillery Battalion 4 and regular riflemen from the Stilfs Company. The excerpt from the troops‘ diary conveys the situation on the day of the accident.

The memorial plaque on the Prader Alm, not far from the ‘Kleinboden’ artillery emplacement.

Transcript from the diary of rayon commando I dated 25 February 1916 Source: Vienna State Archives, Archive: MUSEUM 14/18.
The original position of the guns can be easily localised on the basis of the files from the ‘Ausrüstungsgeneralentwurf der K.&k. Geniedirektion Brixen’ in the field. This comprehensive collection from the Vienna State Archives conveys both the planning and realisation of the right flank position of the Gomagoi roadblock.

The position room ‘Kleinboden’, From: ‘Equipment general design …’, Archive: MUSEUM 14/18

The ‘Schafseck’ emplacement room, from: ‘Equipment general design …’, archive: MUSEUM 14/18
Protection of the artillery position
Infantry positions and observation posts were positioned in front of both artillery positions for close protection.
The battle trench on Kleinboden
The ‘Kleinboden’ position was to be protected by an impressive infantry position that can still be walked through today. The concreted and covered defence system with medieval-style embrasures ran across the plateau.

The battle trench on Kleinboden. Photo Accola, 2006.

Mountain-side access to the infantry position on Kleinboden. Photo: Accola, 2006.
The infantry position at Schafseck
The protection of the Schafseck’s position, located a little to the north of the Kleinboden artillery emplacement, is far less impressive, although just as many guns were stationed there. It is possible that this emplacement was not included in the planning and implementation until later – although the sources do not provide any evidence of this, but: there are no concreted protective structures for defence against infantry attacks. Today, however, the course of the corresponding trenches can still be traced in the terrain. An excerpt from a 1916 photograph taken by the Swiss Intelligence Service shows the state of the trenches at that time. The handwritten updates are based on the situation in autumn 1917 and it can be assumed that the position area was not fully secured.

The ‘Schafseck’ on a depiction of the Swiss Intelligence Service in 1916, supplemented in 1917. Visible from left to right: the Prader Alm, the ‘Schafseck’ emplacement with the protective infantry positions and the ‘Kleinboden’ position, source: Federal Archives Bern, fonds E 27, digitisation and processing: Archiv MUSEUM 14/18.

View from the ‘Schafseck’ to the Prader Alm. Prad (on the left) and Gomagoi (on the right at the Trafoi stream) are recognisable in the valley. Photo Accola, 2006.

The artillery position on Kleinboden, as seen from the ‘Schafseck’. Photo: Accola, 2006.
The ‘searchlight position’
South of the ‘Kleinboden’ artillery emplacement, slightly below the prominent antenna on the edge of the plateau, there is a concrete shelter with an embrasure for a machine gun. With a range of 2,000 metres, from here, the lafted gun could cover the southern outskirts of Trafoi and the Stelvio Pass road.
In order to be able to recognise a night attack in good time, a searchlight was also positioned here alongside the gun. These were powerful searchlights with carbon arc lamps. The standard versions of these searchlights consisted of a 1.5 metre (‘150’) or two metre (‘200’) diameter parabolic reflector with an arc lamp made of two pressed tungsten carbon rods in its focus. The front opening of the parabolic reflector was sealed with heat-resistant quartz glass in the form of a round cover and could be opened for replacing the carbon rods and maintenance. The arrangements required a high electrical output (approx. 12-15 kilowatts), which was generated by petrol or diesel-powered generators.

The Mg and searchlight position at the edge of the ‘Kleinboden’ artillery position. Photo: Accola, 2006.

On the way to the ‘’spotlight position‘’, the view opens up towards the Stilfserjoch; photo Accola, 2006.
On the way to the ‘’spotlight position‘’, the view opens up towards the Stilfserjoch; photo Accola, 2006.
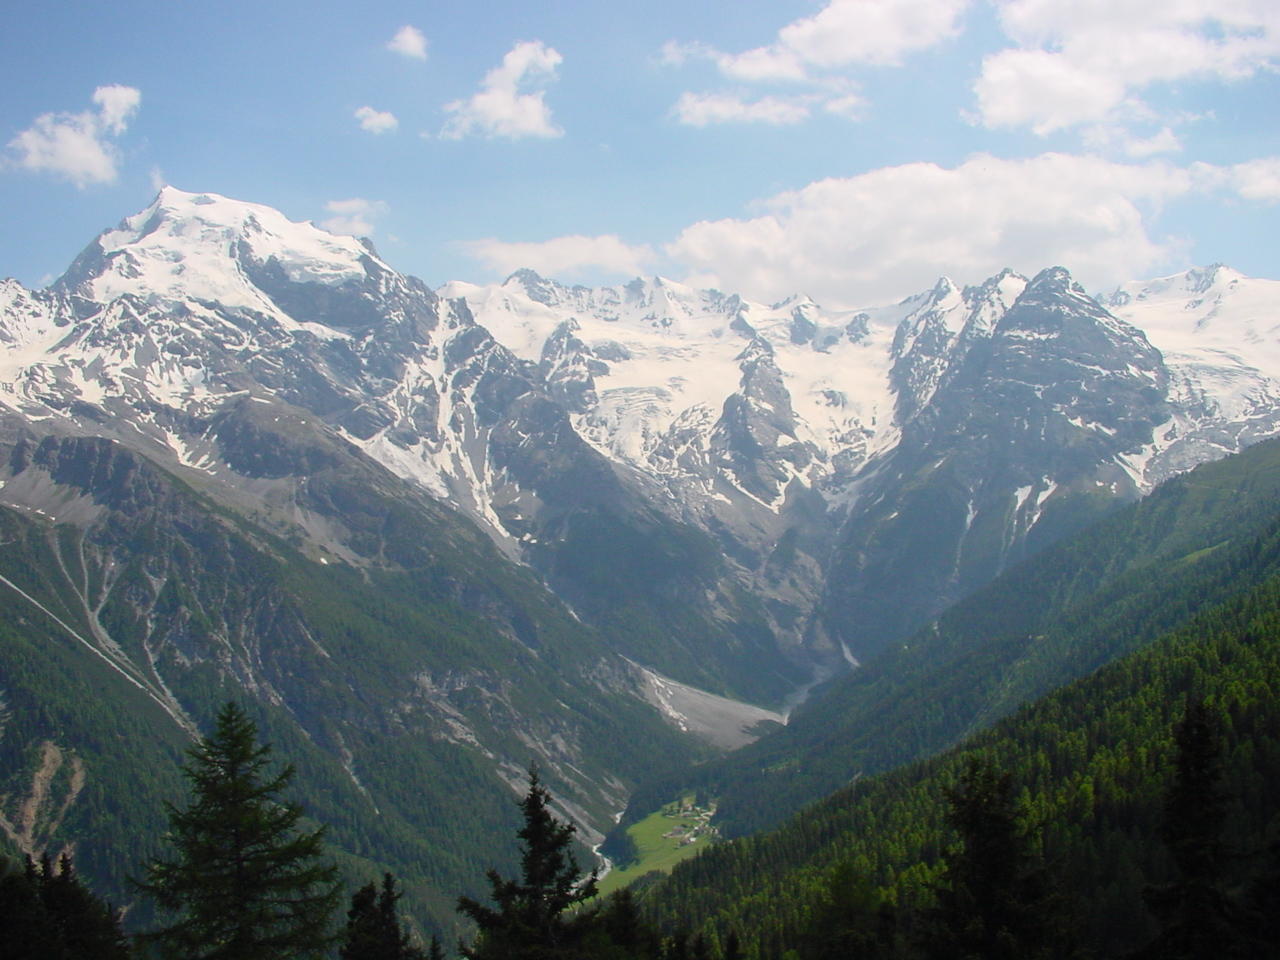
The events of the war along the ‘Ortler front’
As you walk along our hiking trails, your gaze inevitably and repeatedly wanders south-south-eastwards to take in the impressive mountain panorama. With the information provided below, you will marvel at the remaining ice slopes and rocky ridges from a completely different perspective, as there were battles and attacks there during the war that were unrivalled.

The positions along the border between the Ortler and the Tucketspitze. The Austrian bases are shown in blue, those of the Alpini in red. Illustration: Accola, based on a photograph taken in 2006.
Each of the mountain peaks shown above could tell its own war story. However, two events are particularly impressive and should be described here as representative of the unimaginable actions of both warring parties.
The gun transports to the summit of the Ortler
The ascent of the 3905 metre high ice summit is generally reserved for experienced mountaineers. The appropriate equipment and knowledge of alpine risks and dangers are required. Those wishing to climb this dominant mountain are best accompanied by a local mountain guide.
The normal route to this icy giant runs via the Payerhütte and mainly requires sure-footedness on easy rugged terrain (1 – 2 degree of difficulty, short section 3+) and safe walking on steep firn or ice (short sections up to 40°). Ortler mountaineers should only start in safe weather, the rocky ridge is tricky in snowy conditions and it is easy to get lost on the flat Ortler plateau. Overall, however, this is one of the best alpine tours in the Eastern Alps, with a magnificent view of the glacier world awaiting you after the 5-hour ascent. (Quoted from: www.bergsteigen.com)
In the summer of 1916, this route was also used to transport several mountain cannons which were positioned on the summit and the Pleisshorn. The summit base was permanently manned by around 30 men and secured by a field guard with two machine guns on the Hochjochgrat. This position was connected to the accommodation by a 150 metre long ice tunnel.
")
The starting point for transport was the Julius Payer Hut, which was accessed from the Sulden Valley by a transport cable car. The mighty Alpine Club hut perched at 3029 metres on the Tabaretta ridge was built in 1875. Picture: Haller, Knoll Collection, Archive MUSEUM 14/18.

Ascent track below the Tabarettaspitze on the way to the ‘Wandeln’ and the ‘Scharte’, from which the track then led over the Oberer Ortlerferner to the summit (top left). Picture: Haller, Knoll Collection, Archive MUSEUM 14/18.
The ‘Ortler cannons’ were transported by regular riflemen from the Prad battalion (with members of the Prad I, Lasa II, Tschengels III and Lichtenberg IV companies) as well as Russian prisoners of war. Lichtenberg) as well as Russian prisoners of war. The mountain guides of Hochgebirgskompanie 30 were responsible for the technical management of the transports and the necessary safety measures.
Several exponents from these specialised units stood out, whose names and deeds are still widely known today. Captain Lois Molterer was the commander of this company, whose fame is attributed to the actions on the Ortler, the Eiskögele and the Trafoier Eiswand. First Lieutenant Leo Handel would later apply his experience as the ‘ice-building master of the Marmolada’ on the Hohe Schneid and Merano’s First Lieutenant Franz Haller went down in local and military history as the commander of the gun transports on the Ortler.
Dr Franz Haller, the mountain guide officer who led all the gun transports to the high altitude positions, reported on the transport of the first two Ortler guns in the summer of 1916 as follows:
The two guns were transported from Gomagoi through the Sulden valley to Sulden and from there, with great difficulty, to the Payer hut. The transport cableway to the hut could only be used for lighter parts of the mounts and for the ammunition, as the load-bearing capacity of the ropes was not great enough. From the Payerhütte, the transport was carried out on sledges – one gun could be split into two parts. 30 mountain guides and just as many Russian prisoners of war pulled the first gun over the steep Ortler ridge to the summit. Haller continues the original report:
‘After another five days, all parts of the first gun were on the Ortler summit, and the artillerymen immediately began mounting it. The second gun followed in the same way without incident to the lofty heights and was mounted on the right flank of the Ortler on the Pleisshorn. The ammunition followed over the next few days and then we were ready to fire.’
")
The guns were transported to the emplacements in two partial loads (laffette or tube) on sledges. 24 men pulled these on ropes behind them. Picture: Haller, Knoll Collection, Archive MUSEUM 14/18.
")
The partial loads of the gun transports – a few metres below the Ortler summit. Picture: Haller, Knoll Collection, Archive MUSEUM 14/18.
THE USE OF PRISONERS OF WAR
If we want to take something inglorious away from the great achievement of the gun transports, it should be noted that the use of Russian prisoners of war was contrary to international law. The ‘Hague Land Warfare Convention’ (HLKO), which is still in force today, was already signed in the 1899 version by all the belligerents who later took part in the First World War.
The second chapter of this agreement, which is binding under international law, describes the rights and obligations of prisoners of war, with Article 6 stating with regard to their labour:
‘The State is authorised to employ prisoners of war, with the exception of officers, as labourers according to their rank and ability. This labour may not be excessive and may not be related to the war effort’.
While the use of prisoners of war for harvesting work was legal, the use of prisoners for frontline supply work in the mountains certainly fell into the category of prohibited ‘excessive labour’ and was directly related to the ‘war effort’.
")
The foreign uniforms give it away: prisoners of war transporting guns on the Ortler. Picture: Haller, Knoll Collection, Archive MUSEUM 14/18.

The different headgear is striking, especially the Russian infantryman’s plate cap, which is not really suitable for the mountains. Image: Haller, Knoll Collection, Archive MUSEUM 14/18
The summit base
Prior to the gun transports – and in particular for the accommodation of the summit crew – the necessary infrastructure was set up on the Ortler summit ice. For these measures too, construction timber and firewood, stoves for makeshift heating, food and everything else necessary had to be brought to the summit by the route described.
In addition, a field guard had to be set up on the pre-summit to keep an eye on the Italian measures on the Ortler Pass and the Hochjochgrat. Wire obstacles and infantry trenches were to protect the position of the artillery pieces from enemy attacks.

Entrance to the accommodation hut, which was built in an ice grotto a few metres below the summit. Image: Haller; Archive: MUSEUM 14/18, Knoll Collection.
")
Inside the accommodation hut on the Ortler summit. Picture: Haller; Archive: MUSEUM 14/18, Knoll Collection

The view of the Italian-occupied Thurwieserspitze from the Feldwache on the Hochjochgrat. To the right is the double summit of the Trafoier Eiswand, which was also occupied by the Italians at the time of the Ortler occupation in the summer of 1916. Picture: Haller; Archive: MUSEUM 14/18, Knoll Collection.

Wire obstacles for the close defence of the Ortler base. Dominant: the summit of the Königsspitze, whose occupation in the summer of 1917 led to a veritable race between the two opponents. Picture: Haller; Archive: MUSEUM 14/18, Knoll Collection
The Ortler cannons
It is not possible to conclusively prove how many guns were positioned on the summit of the Ortler between the summer of 1916 and the last year of the war. However, there are numerous illustrations of mountain cannons, whose location can be located on or near the summit due to the recognisable surroundings. The front reports also repeatedly provide information on the effect of the Ortler guns – but we cannot rule out the possibility that changes of position were made on the summit and that additional guns were not transported up the mountain for this purpose. The transport of two guns in the summer of 1916 is documented, and their position and operating area are known. Haller at least describes the ‘baptisms of fire’ of the two old cannons (1899) as follows:
‘An Italian machine-gun emplacement was set up on the Thurwieser, which made the Tyrolean teams‘ way to the Kleine Eiskögele sour. The Tyrolean Ortler crew managed to pulverise the Italian machine gun nest on the Thurwieser with a single, truly masterful shot from the Ortler gun they had just dragged up.’
There is also evidence of the transport of two further guns to the Pleisshorn in August 1916 with the ‘Ortler Pass’ theatre of operations. These two mountain guns were of a slightly more modern model.
Then the source situation becomes thinner: with the ‘Race to the King’s Peak’, further artillery action was required. Whether additional cannons were delivered for this purpose or whether existing guns on the summit were moved to a new position cannot be conclusively proven at present.

If there had already been an award for the ‘Press Picture of the Year’ in 1916, this photo of the 7 cm M 1899 mountain gun on the Ortler summit would certainly have made it onto the shortlist. The armoured plate was removed in order to convey to the world that the highest base of the First World War was firmly in Austrian hands. In the direction of the shot: the summit of the Königspitze, on the left the Cevedale. Image: Franz Haller, Archive MUSEUM 14/18, Imboden Collection.

The first Ortler gun (3860 metres above sea level) with the Thurwieserstellung area of action. Image from: Lempruch; Digital Archive: MUSEUM 14/18.

The second Ortler gun (on the Pleisshorn) with the Ortler Pass area of operations. Image from: Lempruch; Digital Archive: MUSEUM 14/18.

Directions of the Ortler guns to the focal points on the Ortler Pass (from the Pleisshorn), the Thurwiese and Königsspitze (from the Ortler base). Map: Kompass Hiking Map South Tyrol online; Editing: Accola

The military installations on the Ortler seen from the Rötelspitze. Detail from the reworked photograph by the Swiss Intelligence Service: Source; Federal Archives fonds E27, Digital Archive: MUSEUM 14/18.

The Ortler gun, in position a few metres below the summit. Picture: presumably Haller, Archive: MUSEUM 14/18, Knoll Collection
Effect and myth
In the aftermath of the war, there was frequent and controversial debate as to whether the huge effort to position and supply the guns on the Ortler summit had been worthwhile. In business terms, one would ask for a balance between the investment made and the profit realised. It goes without saying that the final accounts cannot show black figures; the Ortler soldiers were also among the losers of the war in November 1918.
Even if the Ortler guns were already ‘old ladies’ at the time – built in 1899 and not up to the technological standard of their successors in the field army – their availability and especially their reliability was still important.
The possibility of taking Italian bases on the Thurwieser and Königsspitze under fire was decisive for the course of the battle along these peaks and ridges in the summer and autumn of 1917, as can be seen in the next chapter.
However, the psychological effect of the Ortler occupation on their own and enemy troops should not be underestimated. The assertion of the ‘King of the German Alps’, the occupation of the world’s highest base of the First World War, the ability to supply this base permanently over a longer period of time: all this impressed both the military and the civilian population, who were actively informed about the defence will of the Imperial and Royal Army via the newspapers of the time. & k. armed forces‘ will to defend.
In comparison to other, also extremely spectacular sections of the Austrian south-eastern front, we now have a wealth of photographic material from Defence Area I – especially from the ‘Ortler’ front section. The photographs, which were primarily staged for the local press, were generously released and distributed by the ‘war censors’. This supported the myth of (quote) ‘selfless resistance against the Welsh (foreign, Italian) traitors.’
Trafoier ice wall
The events around the summit of the Trafoier ice wall bear witness to another par force performance by both warring parties. As the name of this 3566 metre high peak suggests, it is steep, icy and cold here!
In order to understand the significance of the battles described below, it is necessary to know the course of the front in the midsummer of 1917.

Course of the front in the summer of 1917. Occupied line of Austria-Hungary (blue): Dreisprachenspitze – Stilfserjoch – Monte Scorluzzo – Passo delle Plattigiole – Naglerspitze – Geisterspitze – Hohe Schneid (Ostgpifel) – Payerspitze – Tuckettspitze – Madatschkamm – Schneeglocke – Kleines Eiskögele – Ortler – Königspitze … Italian occupied line (red): Pass Umbrail – Rese di Scorluzzo – Filone del Mot – Monte Cristallo (Hohe Schneid Westgipfel) – Passo dei Camosci – Trafoier Eiswand – Bäckmanngrat – Thurwieserspitze – Ortlerpass – Hochjochgrat – Monte Zebru – Königsspitze (shoulder position). Map: Kompass, hiking map online, edited by Accola.
A painful gap – the stake in the stomach
A closer look at the course of both lines reveals that the ridge line from the Stilfserjoch to the Grosse Schneeglocke was occupied by Austrian troops. The following section from the Trafoier Eiswand via the Bäckmanngrat to the summit of the Thurwieserspitze and up to the Ortler Pass, on the other hand, was held by the Italians, which gave them the decisive advantage of having an insight into all movements along the Stilfserjoch road. Supply columns on the Franzenshöhe, but also individual supply troops in support of the Austrian high positions, could thus be closely observed and the artillery observer stationed there directed the effective fire to combat them very accurately. The soldier’s wisdom, as the great Clausewitz put it, that ‘whoever has the heights also dominates the depths or the valleys’ was applied here in an exemplary manner.
This ‘thorn in the side’ – Lempruch described it as a ‘stake in the stomach’ of the eastern defence system of his rayon – had to be removed.

Support points and field guards in the area of the ‘gap’ in the Austrian defence deployment along the ridge line on the Bäckmanngrat. Austrian positions (blue) from left to right: Tuckettjoch – Madatschkamm – Schneeglocke – Nashorn – Kleines Eiskögele. Italian positions (red) from left to right: Passo dei Camosci – Trafoier Eiswand – Bäckmanngrat with several field guards – Thurwieserspitze – Eiskögele – Ortlerpass. Map: Kompass, hiking map online, edited by Accola.
The Italian field guards along the Bäckmann ridge were to be cleared accordingly. In his illustrated report, Moritz von Lempruch assesses the variants and risks involved in realising this essential project. He assesses all options and ultimately comes to the conclusion that the most costly option is also the most promising. The Italian summit base on the Trafoi ice wall was to be conquered by means of a tunnel to be built through the north face, which was up to 50 degrees steep. Assault troops were to take the summit crew by surprise at night, take over their accommodation and occupy the ice wall summit permanently. Actions to clear the field guard line on the Bäckmanngrat and on the Thurwieserspitze were to take place later from there.

View from the Schneeglocke towards the Eiswand summit. 1: Austrian-occupied Eiswand shoulder (3421), 2: Eiswand summit (3565), 3: Ortlerhochjochgrat, 4: Eiskögele; 5: Ortlervorgipfel; ….. Course of the attack tunnel, 6-6: Italian embrasures. Illustration and legend from Lempruch, Ortlerkämpfe.

Image description on the back of the photograph: ‘When the steepness begins, spiral staircases are cut into the ice. Attack tunnel, Trafoier ice wall’. Source: Schaumann Archive, Digital: MUSEUM 14/18, Schaumann Collection.
The attack
Lempruch describes the course of the attack in his account as follows:
‘The breakout and the removal of the position were planned for the early hours of 1 September 1917 and were actually carried out. All preparations had been made beforehand: Staged deposition of food supplies in the approximately 1500 metre long tunnel, provision of cable car material for the immediate activation of a supply line to the conquered position after its removal, accumulation of ammunition, etc. had been made in detail.’

The Hochgebirgskompanie 30 before storming the ice wall on the march to Trafoi. Source: Schaumann Archive, Digital: MUSEUM 14/18, Schaumann Collection.
‘When the surprise breakout was successful and the drowsy summit post was silently taken in, and the enemy alarm line was cut off, it turned out that the position crew was housed in a barrack located on a rock step south of the summit position and about 50 metres lower than the latter. Oberleutnant Bayer now decided to abseil down the steep rock face with some of his bold men in order to capture the enemy, who had already been alerted by the inevitable noise and had begun to shoot, possibly in his shelter. The own fire squadron, which was embedded in the rock and ice pinnacles next to the break-out point, supported the action of the bold rope party, which finally came under heavy fire, with well-aimed shots. Some of the enemy had run out of the barracks with their scanty clothing, while others were still inside. There was a fierce melee with hand grenade fights, in which we were ultimately the victors, miraculously without loss.’

The Austrian ice wall shoulder position. Illustration from Lempruch, Ortlerkämpfe 1915-1918.

Conquered Italian position below the summit of the ice wall. Illustration from: Lempruch, Ortler battles 1915-1918.
‘Two officers – including the artillery observer of the ice wall – and about 30 men were captured, as well as plenty of rations and weapons and an entire company registry with records, instructions, orders, diaries, photographs, maps, etc. that were extremely valuable to us. The enemy had suffered heavy losses due to crashes and rifle and hand grenade fire.
Our new garrison immediately established itself in the enemy lines; the enemy counterattack attempted in the morning hours of 1 September, fuelled by hastily brought reserves, failed with further heavy losses. The interrogation of the prisoners yielded further very valuable material for the defence command; however, despite all efforts, including mine [Lempruch’s], nothing could be brought out of the officers, who behaved with great dignity, which I expressly state here in their honour.’
So much for Lempruch’s account of the high mountain company’s daring action on the Trafoi ice wall.
The Italian reaction
After the successful occupation of the Eiswand summit, preparations were to be made for a further advance along the Bäckmann ridge to the Thurwieserspitze and the Ortler Pass. However, the Italian artillery put a stop to these plans by fiercely firing on the Austrian ice wall position. Four batteries took the summit under constant fire. To make matters worse, the ice tunnel – which had to be used for supplies – often collapsed and could only be used once it had been repaired.
The intensive use of artillery was a sign that the Italians were preparing to recapture the ice wall position. The Austrians had to weigh up whether it was justifiable for the few mountain soldiers, who were often cut off from supplies, to remain on the ridge and whether they should be exposed to an expected counterattack. However, the tactical importance of the ice wall position was decisive for both parties and so the Austrian decision was made to hold the position.
Lempruch describes the subsequent action in his work as follows:
‘On 3 September, on a clear, visible morning, the expected enemy counterattack took place with an unprecedented, ruthless use of manpower on the part of the enemy. There was simply too much at stake for him to justify the measures he had taken in the eyes of objective military criticism.
Heavy concentrated artillery fire had been on the summit position since dawn, so that the brave and much-tried Kaiserjäger lieutenant Kurzbauer, a Viennese, who was in command of the position that day, had every difficulty in keeping unnecessary losses at bay; then the enemy attacked the position in three strong attack columns, unconcerned about their heavy losses.’

The situation on 3 September 1917 morning: advance of the Italian Alpine (red) against the Austrian ice wall position. The arrows do not really convey the alpine challenge under the additional threat of enemy fire. Map: Kompass hiking map of South Tyrol online; edited by Accola
Lempruch continues:
‘One echelon climbed up from the Passo dei Camosci, a second from the Camosci glacier in a north-westerly direction. A third moved along the Bäckmann ridge, i.e. from Thurwieser, towards the west. A total of 450 men may have been involved in this attack, which was opposed by our ice wall summit crew of 15 men. I had all my artillery in this area unleash their maximum fire. The Ortler and Pleisshorn batteries, the guns of the Madatsch position, the cannon on the Nashorn, the two field howitzers on Monte Livrio, a total of eleven guns, united their fire on the small attack area. From the Königspitze, the Ortler and the Kristallspitzen it was possible to observe that the enemy was suffering heavy losses. The Alpini could be seen falling en masse from the Bäckmann and Camosci ridges into the terrible depths on our and the Italian side. The ice wall summit position with its dashing leader, Lieutenant Kurzbauer, who was wounded several times, heroically defended itself against the 30-fold superiority. Their machine-guns made terrible havoc among the advancing enemy. Soon the retreat of the small group of ours was cut off by an enemy bypass movement that blocked the ice tunnel. The enemy penetrated the position and occupied it. Eight of our crew were killed, the rest more or less seriously wounded. Lieutenant Kurzbauer was taken prisoner with the survivors after they had destroyed the machine guns. Although the Eiswand summit position was lost to us, the defence of it, easily comparable to the battle for Thermopylae, is a golden leaf in the laurel wreath of Tyrolean national defence in 1915/18. The bravery and sacrifice of the enemy must also be fully acknowledged. His bloody losses in this action of around 120 men are certainly not too high.’
Fake news ? - Dealing with sources
How do we know what happened back then and is it really true? Analysing sources, records, legends and anecdotes requires the necessary intuition.
Primary sources are considered reliable. This category includes troop diaries as well as ‘war files’ such as orders, service regulations and telegrams that are still available today. What they all have in common is the criterion of the ‘immediate point in time’ – in diaries, people recorded what had happened in the evening, unaware of the later history of the events – as well as the fact that these sources are generally not available in printed form. Corresponding documents can be found in state archives, but are unfortunately often incomplete. The lack of records from the south-west front from spring 1917 onwards bears witness to the disintegration of the otherwise ‘thoroughly administered Habsburg monarchy’.
The troop diary for the summer of 1917, of all things, containing the events surrounding the Trafoi ice wall, cannot be found in the Austrian State Archives.
Secondary sources must be viewed in a more differentiated way. These are coherent accounts, based on primary sources, of events whose impact on the timeline was known at the time of publication. Records of participants in the war – such as Lempruchs work, published in 1925 – fall into this category. The presentation of facts and interpretations based on memory or justification are in the realm of the at least partially ‘questionable’.
Representations , on the other hand, are based on primary and secondary sources which, if written in a well-founded manner, reflect and evaluate other sources, preferably opposing ones. With reference to the cited sources, these usually claim to fulfil the requirements of a scientific work and are submitted and published as a master’s thesis or even a dissertation. The content of this website also falls into this category …
The crux of images and figures …
It is important to know that all published photos – and thus probably also the original images available today – were subject to censorship. Released images were purposefully staged – images of fallen soldiers probably escaped the censoring authorities, but there are very few of them.
As with images, figures also have a significant psychological influence on the reader: Italian sources quantify the number of soldiers involved in a fundamentally different way than the Austrian depictions do. Heroic defence is perceived as such when a few successfully defend themselves against a large number of attackers; attacks, correspondingly, when there are a few against many defenders. By way of comparison, this corresponds to the fact that a football team can still achieve an honourable draw after being sent off three times…

Illustration of the diary of Defence Tray I from 22 December 1916 and the following days. In the first days of the war, the entries were made exclusively by hand; the additional insertion of telegram strips began in mid-1916. The dominant additions in blue lettering are not conclusively traceable, but it is conceivable that the signatures confirm the commander’s inspection. Whether the signature on the left-hand page (bottom right) is the ‘abbreviation’ Lempruch is conceivable but cannot be proven. A copy of the defence array diaries was made after the war. See illustration below. Source: Vienna State Archives, Digital: Archive MUSEUM 14/18.

The copy of the diary shown above, which can also be found in the Vienna archives. The person who wrote it and the date it was written are unknown. It is striking that the author has already made a judgement from the primary source. For unknown reasons, the content of the telegram was not included. The content of the primary source has been reduced so that this is already a secondary source with an official character. ‘Ad Fontes’ – to the sources – wherever possible, the originals should be consulted to form a credible picture. Source: Vienna State Archives, Digital: Archive MUSEUM 14/18.

The backs of photographs from the front sections often convey more information than the actual content of the picture. Here is the release of a picture with a given legend of the trilingual top. The form, written in Hungarian, authorises the publication of the image with a binding caption. Source: Vienna State Archives, Digital: Archive MUSEUM 14/18.
Recommended reading
Accola, Fuhrer: Stilfserjoch-Umbrail 1914-1918, Documentation, Miltärakademie an der ETH Zürich, Au, 2000.
Lempruch: Otlerkämpfe 1915-1918, Der König der Deutschen Alpen und seine Helden, new edition, Golowitsch (Hsg), Buchdienst Südtirol, 2005.
Marseiler, Bernhart, Haller: Zeit im Eis – Gletscher geben die Geschichte frei – Die Front am Ortler 1915-1918. A splendid illustrated book with photographs by First Lieutenant Franz Haller (1894-1989), mainly of the Ortler gun transports. Introduced by thoughts from his son Franz Haller Jr. The second part of the work deals with the recovery of finds in the front area, which are accumulating due to the intensive melting of the glacier mass. Athesia, 1996.
Would you like to hike this trail in the company of an expert?
You are in good hands on this page.