


Scorluzzo – following in the footsteps of the austrian „Standschützen“and the italian „Alpini“
Until 1918, the border between the Kingdom of Italy and the dual monarchy of Austria-Hungary ran right across the Stelvio Pass. A border in rock and ice, which was bitterly fought over during the war years 1915-1918. The same hill dominating the Stelvio Pass was always at the centre of the battles: Monte Scorluzzo. The trail of the same name is designed to give visitors an Italian perspective on the conflict.
The following themes are explored on the way to the summit and the surrounding area:
-
- The Italian disposition at the beginning of the war
- The Italian troops in the Ortler theatre of operations
- The occupation of Monte Scorluzzo
- The battle for Monte Cristallo – Hohe Schneid
- Political endeavours to pacify the Stelvio section
- End of the war

Starting point: Stilfserjoch – valley station of the mountain railway
End point: Swiss-Italian border crossing (Quarta Cantoniera)
Walking time: 5-7 hours
Marking: white-green-red
Requirements: good physical condition and surefootedness, Technical: T2, in places T3
SCORLUZZO’ ROUTE GUIDANCE

A: Battery ‘Ferdinandstellung’ – B: Passo delle Plattigiole – C: ‘Kleiner Scorluzzo’ – D: Summit base – E: Austrian flank position and transition to the ‘Terra di nessuno’ (no man’s land) – F: Italian flank position and trench – G: Base at Filone del Mot – H: The ‘Alpine village’ at Filone del Mot – I: Interception line at Piano di Scorluzzo – K: Lago di Scorluzzo – L: Positions on the Rese di Scorluzzo – M: ‘Lago alto’ cavernous artillery position
A ROUTE DESCRIPTION FROM A MILITARY-HISTORICAL PERSPECTIVE
A supplementary, detailed description of the route can be found in the hiking guide ‘The Stelvio-Umbrail military-historical hiking trail’ from page 72. The following explanations highlight places along the route and explain their historical significance.
Stelvio Pass – Passo delle Plattigiole
You leave the Stelvio Pass (at the valley station of the cable car) in a southerly direction on the steeply ascending road. After the second hairpin bend, you will come across the remains of the Austrian artillery position. Three cavernous guns formed the so-called ‘Ferdinand position’. The three gun chambers embedded in the (crumbling) rock lay exactly on the border between the two warring nations at the time. Standing on the road, you are on Italian territory; if you climb the rocks on the left, you are in what was then Austria. Access to the unconnected caverns was from the rear of the rocky ridge.
The firing direction of the guns can be traced due to the lateral boundaries of the rock openings, which are still recognisable today. The target area included the Italian-Swiss border crossing on the Umbrail Pass with the Italian base there, as well as the entire intermediate area along the pass road and the Italian artillery position at Laghetto alto, which had been cavernised.
The gun emplacements of the ‘Ferdinand position’ are still accessible, but there is a risk of collapse.

The wooden-clad muzzle of the centre gun cavern of the Ferdinand position in 2007. Note the very limited swivel range with regard to the direction of fire.

One of the ‘Ferdinand guns’ in position. Simple 7.5 cm calibre mountain guns were used, not actually fortress guns designed for this purpose.
To the right, a few metres below the road, you can see a striking line that could be interpreted as a former ‘track’. In reality, however, it is the course of the infantry obstacles that were erected to protect the artillery position.

The Stelvio Pass was secured against infantry attacks with wire obstacles in the summer of 1915. In the centre of the picture, the buildings at the top of the pass on the left, the Ferdinand position rising out of the snow on the right and the Naglerspitze on the horizon, which was also occupied by Austrian troops.

The Ferdinand position in the winter of 1915/16. The infantry obstacle to protect the position, the course of which is still clearly recognisable today, can be seen in the picture on the right. On the horizon to the right, the summit of the ‘Kleiner Scorluzzo’ with the Austrian pre-summit base. The crossing below the summit (left) is the Passo delle Plattigiole. Today’s road to Monte Livrio did not yet exist, of course.
Only when we reach the Passo delle Plattigiole does the real significance of Monte Scorluzzo ‘reveal’ itself for the tactically relevant considerations of the time. The rugged Valle dei Vitelli (calf valley) stretches out in front of us, which initially descends gently but then steeply at the height of the second Cantoniera in Valle Braulio to reach today’s Stilserjoch road.
So anyone wanting to reach the Stelvio Pass from the Valtellina side had two options: the efficient road through the Valle Braulio (today’s carriage road) or the bypass through the Valle dei Vitelli.
Accordingly, this crossing was fortified by a system of defences to intercept any advance. This system ran from the foot of the Naglerspitze, which is on our left on the Passo delle Plattigiole, to the upswing to the ‘Kleine Scorluzzo’ at the foot of which we find ourselves at the lowest point of the crossing.
")
The Passo delle Plattigiole, seen from the ascent to the ‘Little Scorluzzo’. The Valle dei Vitelli can be seen on the right. To the right of the road you can see the course of the infantry line, which was intended to prevent an Italian advance along this axis.

Die Einmündung des Valle dei Vitelli ins Brauliotal. Ein Vorstoss durch diese wilde Gegegend war – wenn überhaupt – höchstens bei schlechten Sichtverhältnissen von möglicher Erfolg gekrönt.
Passo delle Plattigiole – Kleiner (little) Scorluzzo
On the ascent to the Scorluzzo, we leave the official hiking trail (marked red and white) after reaching the first altitude level and keep to the right, only to reach a striking plateau a few metres later. This is the first time we cross a trench system that runs at right angles to the defensive position on the Passo delle Plattigiole and come across impact craters that bear witness to Italian artillery fire.
The trench system is part of the flank position of the pass and it requires no imagination to interpret its course in the context of tactical thinking if you realise the following principle.
Imagine a horseshoe or a horizontal ‘U’. Its base (i.e. the bow) is in the catching position – the two sides are laid out in the direction of the opponent. Whoever was able to occupy this ‘horseshoe’ was able to attack the enemy from three directions at the same time. With this image in the background, you will be able to understand the course of any positional system. Good to know: such ‘horseshoes’ came in a wide variety of sizes. So very small, narrow and also very large, wide ‘U ’s. But the principle was always the same. And even more important to know: the Italians also used this tactic of position selection.
The artillery traces, in turn, show an attacker’s endeavour to hold down these positions so that an attack without direct fire from the enemy was possible at all.

The field guard line carved into the rock on the edge of the ‘Kleine Scorluzzo’ plateau. The recognisable embrasure allows flanking support fire at the crossing of the Passo delle Plattigiole.

The running and fighting trench on the first ridge line of the plateau. These were occupied when a corresponding alarm was raised from the field guard line (picture to the left).

Position plan of the ‘Kleiner Scorluzzo’, reproduced from an original sketch by the commander of the Ortler front, Moritz Freiherr von Lempruch. Illustration: David Accola based on original documents from the Schaumann Archive, Vienna.
On the eastern edge of the plateau – referred to as the ‘cavern’ in the above illustration – we come across the concreted foundations of the cable car station. The Scorluzzo base from the Stilfserjoch (labelled ‘Ferdinandshöhe’ in the illustration) was supplied via this transport cableway. Concrete was a rare commodity and was only used where it was absolutely necessary due to the required strength.
The actual base on the summit of the ‘Kleine Scorluzzo’ was aligned on two sides. From here, it was possible to fire on the approach to the Stelvio Pass on the Braulio side (north) as well as to counter an attack from the Valle dei Vitelli (south).

Effective range from the summit base to the Stilfserjoch apron. In the centre of the picture is the pass summit of Pass Umbrail, visible on the right at the edge of the picture: the height of the Dreisprachenspitze.

The battle trench on the summit of the ‘Kleiner Scorluzzo’. In the background (centre of the picture) the Naglerspitze, also occupied by the Austrians, and to the right of it the ‘Hohe Schneid’ on which the Alpini and Standschützen were facing each other within a stone’s throw.
We reach the summit of the ‘Grosser Scorluzzo’ via the official hiking trail. This runs steeply along the left (southern) ridge and follows exactly the former connecting trench from the ‘Kleine’ to the ‘Grosser Scorluzzo’.
Grosser (great) Scorluzzo
Immediately after the outbreak of war – at the beginning of June 1915 – Alpini patrols occupied the summit. The peak was already on Italian territory at the time and provided a view across the now embattled border into the Trafoi Valley. Provided the weather was good, Austrian movements could be recognised at an early stage.
National defence from a Viennese perspective
Until the outbreak of war, the defence strategy of the Austro-Hungarian Empire was based on countering an Italian advance only in the lowlands of the valley, but never on the ridges of the actual national border. The ‘Gomagoi roadblock’ built between 1860 and 1862 (at the confluence of the Sulden Valley and the Trafoi Valley) seemed to the Austrian general staff to be the obvious choice, and appropriately prepared lines of defence were based on this barrier. However, this was ‘pre-war thinking’ and was overtaken by the new situation.
For more detailed information on Austria’s defence system, please refer to the corresponding article on the „Kleinboden ’ page.
National defence from a Tyrolean perspective
The Standschützen called up for national defence considered this to be a gross mistake on Vienna’s part, as they came from the region directly affected by the outbreak of war. They ran farms and alpine pastures near the border, which – in line with Vienna’s intention – were now to be ceded without a fight. This contradicted their idea of national defence in the grossest way. ‘Our land begins at the border – not where the Viennese would like it to be’ – was the widespread opinion of the local population – and this was to have consequences.
Andreas Steiner’s push party company
On 4 June 1915, gendarmerie cavalry captain Andreas Steiner decided to undertake an operation that would have a significant impact on the course of the war on the Ortler front. With around 40 men, divided into three groups, he pushed the Italians off the summit of Monte Scorluzzo. This attack took place in poor visibility and was initiated by artillery fire from the Goldsee position. As a result, Mount Scorluzzo was permanently occupied and remained in Austrian hands until the end of the war. What was described in later reports as a heroic act, however, received little attention during the first days of the war.
The diary of the command responsible for the defence of the Ortler section records the following on 4 June 1915:
„The accommodation hut built by the Italians on the Scorluzzo was shot up by our own artillery. After the Italians retreated, our patrol found sleeping bags, coats, cooking utensils, etc.
The detachment reported to the III Cantoniera withdrew further towards Bormio.
At Bochetta di Forcola work is being done to prepare the position.
Otherwise unchanged.“
The entry in the diary suggests that the occupation of the Scorluzzo cannot have been an infantry attack in the classic sense. The Italian troops withdrew from the summit due to the artillery fire, whereupon it was occupied by Detachment Steiner without a fight.

The occupation of Monte Scorluzzo and its immediate consequences. Source: Accola, Documentation Stilfserjoch-Umbrail 1914-1918

Knight Commander Andreas Steiner, the ‘hero’ of Scorluzzo, applied for the Order of Maria Theresa shortly afterwards, but was refused. Vienna saw his action as ‘contrary to the intention of the war’.
Occupation of the high ground positions
The occupation of the Scorluzzo meant that Austria’s entire defence line had to be shifted. The original blocking positions were disarmed and the guns were positioned on the dominant heights, for example on Monte Livrio, the Naglerspitze and of course on the summit of the Scorluzzo.

The summit base on the Scorluzzo after a sketch by Moritz von Lempruch. Illustration: David Accola based on original documents from the Schaumann Archive, Vienna.
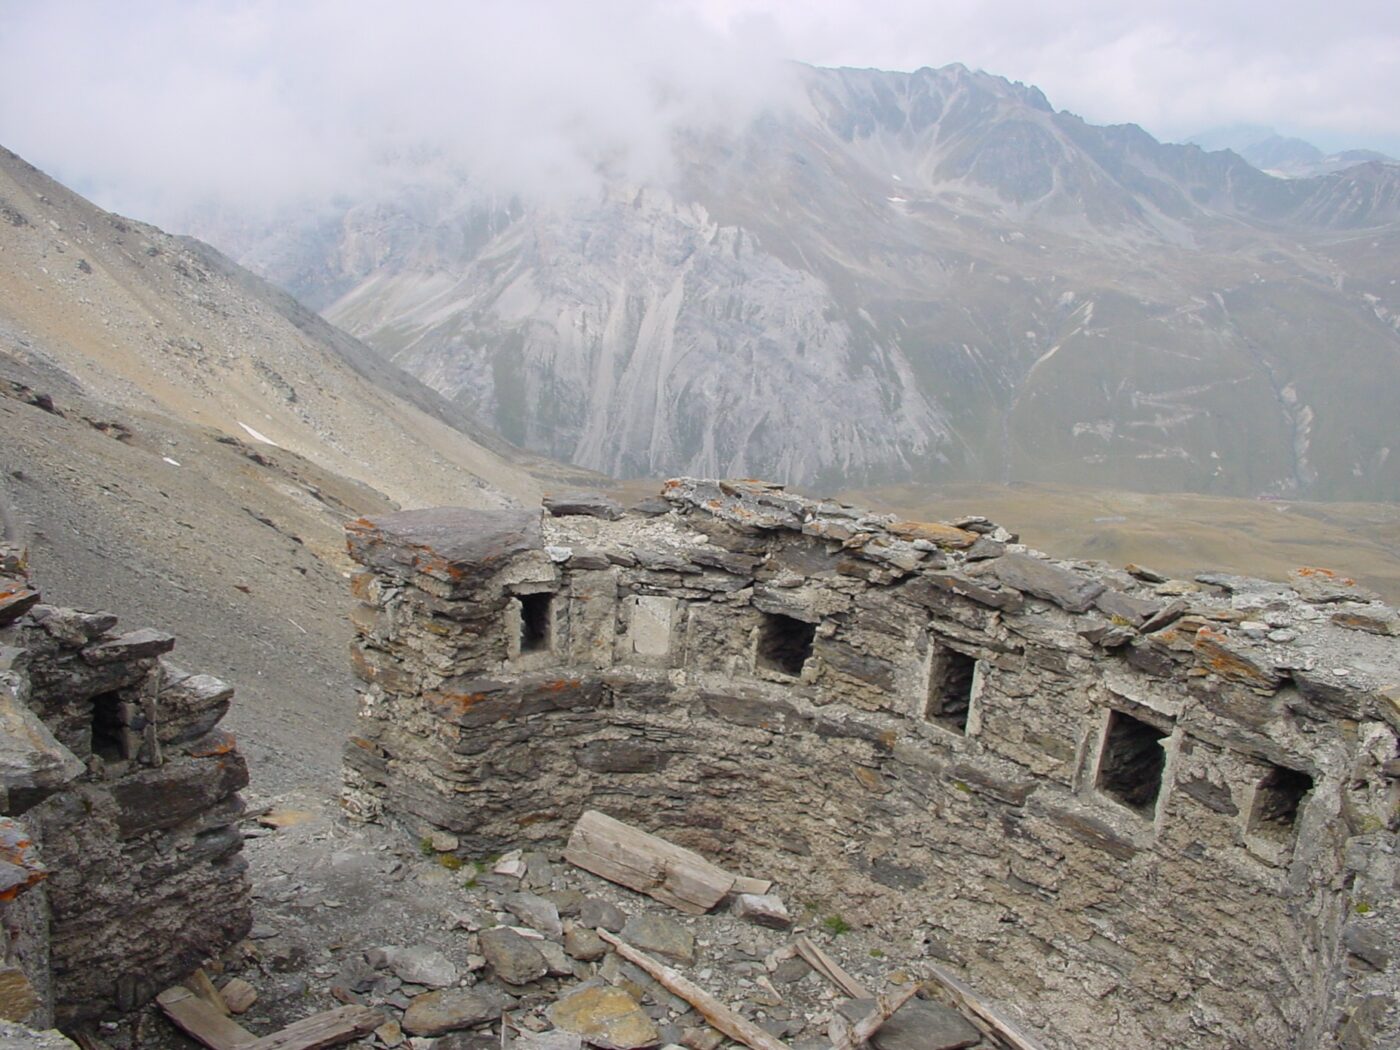
The summit base
On reaching the highest point of Monte Scorluzzo, we first come across the remains of the cavernous shelter labelled No. 1 on the sketch above. Lempruch describes it as the shelter of a ‘swarm’, which in today’s military parlance corresponds roughly to the strength of a ‘group’ (i.e. 8-10 men).
The course of the northern trench and battle ditch is easily recognisable. The remaining combat infrastructure is very difficult to localise in the terrain. The caverns have collapsed and their entrances are almost impossible to find.
If we add Lempruchs information on the available accommodation capacity (two platoons and three groups), the manpower on Monte Scorluzzo can be calculated as a weak company (around 90 men).

The entrance to the cavernous group accommodation on Monte Scorluzzo

The cavernised field gun 75 (9 cm), which was positioned in the south of the base. (Picture: Knoll Collection, Archive Stelvio-Umbrail 14/18)
Descent to Filone del Mot
The descent from the summit is via the south-west facing ridge to Filone del Mot, where we also come across Austrian positions that were built to protect the summit base. While the route today mostly follows the course of the ridge, the Austrian soldiers had to take great care to avoid being seen on this ridge line. This was easily visible from the Italian positions on the Filone del Mot and every movement could be observed very closely – provided visibility was good. A volley of fire from the Alpini was the logical result of this observation.
At the foot of the compact rock formation, we came across the last traces of the standard bearers, the field guard. Finding them is easy. You will have passed their location by the time you cross the wire obstacles (now lying on the ground). This wire obstacle ran across the ridge and was pulled up to the centre of the western flank of the Scorluzzo.

The remains of the wire obstacle protecting the summit base at the Austrian field guard on the Filone del Mot

The south-west ridge of the Scorluzzo with the location of the Austrian field guard and the course of the wire obstacle that can still be found today. View from the ‘no man’s land’ at Filone del Mot.
terra di nessuno – the no man’s land
The 300 metres (as the crow flies) between the Austrian field guard at the foot of the summit structure and the Italians‘ first base on the Filone is known as “no man’s land”. There were neither strongpoints nor obstacles in this zone – but this movement zone was extremely ‘leaden’. Approaches to enemy positions only had a chance of success if the enemy could not see, was asleep or had to brave the often adverse weather conditions, i.e. in fog, at night or during storms.

By now at the latest – in no man’s land – you should have come across them. Not historically relevant but incredibly beautiful. If you don’t find your way: be patient and enjoy the moment.

When you reach the first outpost of the Alpini, you leave no man’s land. Strikingly, the Italians were already the better muratori (masons) back then and this impression will be confirmed later on.
ALONG THE FILONE DEL MOT
Monte Cristallo – Hohe Schneid
On the path along the Filone, the striking siluette of the Hohe Schneid (Italian: Monte Cristallo) dominates the view on the left. The rocky peak (right) was occupied by the Italians in October 1916 and made accessible by cable car. This gave the Alpini the opportunity to take the Austrian base on Monte Scorluzzo under fire.
In the winter of 16/17, the Austrians dug an attack tunnel from the Naglespitze through the Cristallo Glacier and the then much thicker ice wall and occupied the ice summit on 17 March.
The outposts of the Standschützen and Alpini were now within a stone’s throw of each other and it is easy to imagine that the war was being fought on this icy vantage point in a different way to what was expected in Rome and Vienna. Anecdotes tell of the fraternisation of the summit crews, which sometimes resulted in an exchange of food.

Representation of the Austrian and Italian positions on the Hohe Schneid (status: autumn 1918). Published with the kind permission of the Kaiserjägermuseum Innsbruck.

Tunnelling work in the attack tunnel to Hohe Schneid: Image archive 14/18, Schaumann Collection

The Italian Cristallo position as seen from the Austrian base on the Hohe Schneid: Image archive 14/18, Schaumann Collection
THE ITALIAN BASE ON THE FILONE DEL MOT
We follow the hiking trail along the ridge to visit the infantry base on the Filone. The path is in remarkably good condition, as it is supported on the slope by solid masonry. If you had followed this route over 100 years ago: You wouldn’t have seen anything – and (even better) you wouldn’t have been seen. The hiking trail follows the then covered access trench to the field station, which you passed earlier.
Immediately before the last ridge ascent of the Filone, we leave the official path and bypass it on the left. A few metres below the ridge, we come across an impressive trench that leads to the aforementioned base on the Filone.

Observation shelter at the Filone base with Monte Scorluzzo in the background.

Visible and splinter-protected access to the base.

General overview of the base

Travelling over a position in the base. It is conceivable that a machine gun was positioned here to attack the Scorluzzo south-west ridge. However, this is merely an assumption.

The ditch system is still in remarkably good condition 100 years after its construction.
FROM FILONE TO ‘MACHU PICHU’
Immediately after the Filone base, we leave the fighting positions and enter the rear area, which was set up for logistical support. The foundations of the buildings along the way are impressive and bear witness to the fact that the Italians housed a large number of soldiers here.
We come across accommodation buildings and the remains of a kitchen barrack – at least the fact that there are a huge number of tins in the immediate vicinity of the barracks suggests no other conclusion.

Remains of accommodation on the descent from the base. The crew of the base at Filone was housed and catered for here.

Up to 60 soldiers could sleep in the individual buildings. Cramped, stuffy but at least protected from the weather and warm.
‘MACHU PICCHU’ – THE ALPINE VILLAGE ON THE FILONE
The legendary Inca settlement in the Peruvian Andes was discovered in 1911. It was therefore hardly surprising that the comparison with the small Alpine village at the foothills of the Filone del Mot was obvious, as it is located high above the Val Braulio, similar to its model.
The term ‘un vero piccolo machu picchu’ can also be found in official documents and diaries, so that its use seems legitimate – even if the dimensions differ from the original.
It is not possible to determine conclusively how many soldiers were accommodated in the Alpine village. However, if we assume that one or two companies were accommodated here, we are probably not wrong.
Machu picchu’ was supplied by a transport cable car from the Valle Braulio, the valley station of which was located at the 3rd Cantoniera – not far from the war cemetery at the time.

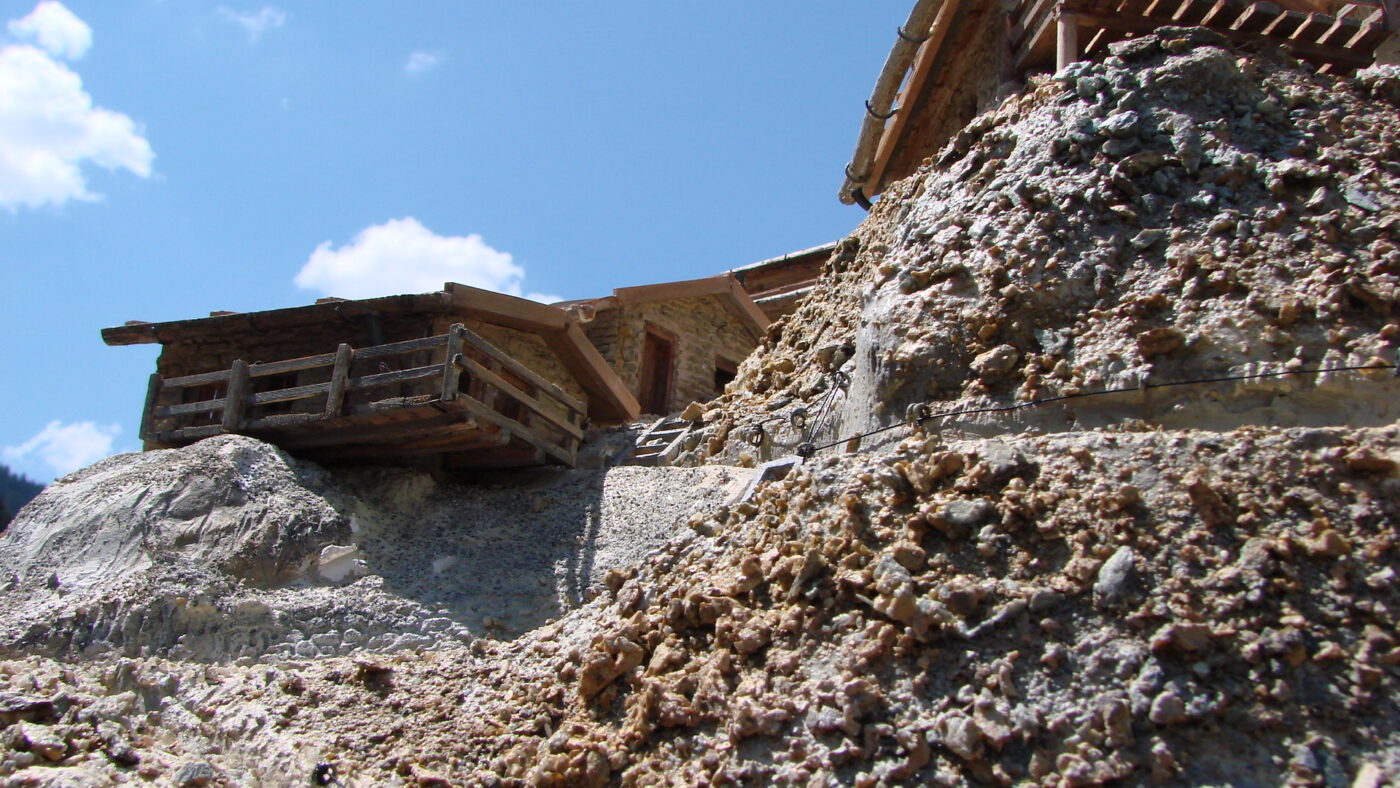
Ein kleines „Machu pichu“ am Filone del Mot. Aufnahme 2017.

In 2012, the ‘Machu picchu’ site was gently renovated by employees of the Stelvio National Park. This picture dates from 2007, i.e. before this work.

The model reconstruction of the alpine village as it can be seen today in the MUSEUM 14/18.

Unfortunately, both the number and quality of remaining photos of the impressive alpine village on the Filone are extremely limited. Image: Archivo Museo Vallivo Valfurva; published in: Belotti, Walter, dallo Stelvio al Garda, alla scoperta dei manufatti della prima guerra mondiale.

Grundriss des Alpinidörfchens, Plan: Archive of the Lombardy Committee of the Stelvio National Park; published in: Belotti, Walter, From Stelvio to Garda, discovering the artefacts of the First World War.
Italian defence measures in the Braulio Valley
From the lookout point in the Alpine village, you get your first impressive view of the deep valley leading towards Bormio. Right at the foot of the steep ridge was the second Italian defence position.
They were also getting ready for an Austrian attack and took the necessary defensive measures.

Italian defensive measures in the Braulio Valley assuming Austrian attacks in the Valtellina (dashed arrows). Supplemented illustration from: Accola, Fuhrer: Stilfserjoch-Umbrail 1914-1918, Documentation, 2000, Au-Wädenswil.
From ‘Machu Picchu’ to Rese di Scorluzzo
The descent from ‘Machu Picchu’ is via the north-western flank – in military terms, via its front slope. Accordingly, there are no remains of fortifications here. Only a few wooden beams and remnants of wire mesh can be found along the trail. These were probably carried to their current locations over the years by avalanches from the Filone. However, these are not historically relevant.
Upon reaching the green plateau at the foot of Monte Scorluzzo – marked on maps as ‘Piano di Scorluzzo’ – we come across Italian defensive positions again. The course of the defensive line, which runs straight along the ridge, is clearly visible despite the vegetation that has now returned. It can be assumed that the line was never reinforced by a system of trenches, although the ground conditions would have made this possible again here. However, this is understandable given the potential Austrian attack area. A corresponding attack would have had to descend from the summit of Monte Scorluzzo via its steep north-western flank, which was exposed to almost all Italian guns. An extremely risky undertaking, therefore.
The ‘horseshoe principle’ explained at the Passo delle Plattigiole can also be found on the Piano del Scorluzzo, here in a very extensive form. The right flank was provided by the Filone del Mot and the left by the Rese di Scorluzzo, the striking north-western ridge of the eponymous peak.
For a short distance, we follow the clear mountain stream, lined with lovely cotton grass, then turn slightly to the right, ascending briefly to reach Lago del Scorluzzo. The water level of the almost circular mountain lake depends on meltwater. It has no above-ground inflow or outflow. Accordingly, it is not surprising that this lake, which is full to the brim in early summer, is reduced to a puddle at most in late summer, especially after summer months with little rain.

Visible on the left of the image: the course of the Italian defence line on the Piano di Scorluzzo, with the watercourse leading away on the right.

View from the northern peak of the defensive line towards Lago di Scorluzzo. The summit of Monte Scorluzzo, with the ridge sloping down to Filone del Mot on the right, dominates the background. On the left, you can see Rese di Scorluzzo and the striking pre-summit.
The Rese di Scorluzzo
The ascent to this militarily and historically interesting peak begins at the northern end of the Piano di Scorluzzo via easily identifiable, steeply ascending trails.
The trails on the Rese are not marked and are not maintained. However, a visit is still worthwhile for die-hard military historians. However, it should be noted that the Rese, at 2,887 metres above sea level, turns out to be a dead end. The ascent to the main summit of the Scorluzzo – through the ‘no man’s land’ there – is really only suitable for visitors who are experienced climbers. The rock is very brittle and climbing without a rope is strongly discouraged.
On the ‘accessible’ part of the Rese, we come across impressive and astonishingly well-preserved positions from which flanking fire support was possible both in the direction of Piano di Scorluzzo and in the direction of ‘Lago alto’, the Italian artillery base which we will encounter later on. The Rese was manned by a platoon of about 30 men, who found accommodation here in very simple shelters. The foundation walls of these structures can still be found and interpreted.

One of the many well-preserved staircases leading to the Rese di Scorluzzo.

A trench on the Rese flanking the position on the Piano di Scorluzzo.
The Lago Alto artillery position
From the foothills of the Rese di Scoluzzo, follow the tracks at the same altitude and after about 300 metres, turn right and climb slightly until you reach a wide road. You are now on the military road that was built from the 3rd Cantoniera to supply the Lago Alto artillery position.
We follow this road and reach it after a good ten minutes‘ walk. The road leads us directly to the underground gun chambers, which were renovated in 2012.
The cannons there were both offensive and defensive in nature. The northern caverns were aligned to cover the Stilfserjoch pass and the border with Switzerland. From the southern caverns, it was possible to fire on the Austrian positions on the pass and as far as Trafoi, given the range. However, the latter option would have violated Switzerland’s neutrality and was only used in very rare cases after objections were raised. More detailed information on this fascinating topic can be found on the ‘Trais Linguas’ page.
After another 20 minutes along the well-marked hiking trail, we reach the Stilfserjoch Pass road.

Access to the cavernous artillery position at Lago Alto.

Lago Alto – a charming mountain lake… which invites the daring to take a (really) cool dip just before the end of the hike.

Would you like to walk the Scorluzzo Trail with an expert guide?
YOU ARE IN THE RIGHT PLACE ON THIS PAGE.